|
|
||
|---|---|---|
| .github/workflows | ||
| gradle | ||
| images | ||
| library | ||
| .gitignore | ||
| LICENSE | ||
| README.md | ||
| build.gradle.kts | ||
| gradle.properties | ||
| gradlew | ||
| gradlew.bat | ||
| settings.gradle.kts | ||
README.md
Multiplatform library template
What is it?
abcde*f*
This repository contains a simple library project, intended to demonstrate a Kotlin Multiplatform library that is deployable to Maven Central.
The library has only one function: generate the Fibonacci sequence starting from platform-provided numbers. Also, it has a test for each platform just to be sure that tests run.
Note that no other actions or tools usually required for the library development are set up, such as tracking of backwards compatibility, explicit API mode, licensing, contribution guideline, code of conduct and others. You can find a guide for best practices for designing Kotlin libraries here.
How to publish?
This guide describes the steps of publishing a library built with Kotlin Multiplatform to the Maven Central repository. To publish your library, you’ll need to:
- Set up credentials, including an account on Maven Central and a PGP key to use for signing.
- Configure the publishing plugin in your library’s project.
- Provide your credentials to the publishing plugin so it can sign and upload your artifacts.
- Run the publication task, either locally or using continuous integration.
This guide assumes that you are:
- Creating an open-source library.
- Using macOS or Linux. If you are a Windows user, use GnuPG or Gpg4win to generate a key pair.
- Either not registered on Maven Central yet, or have an existing account that’s suitable for publishing to the Central Portal (created after March 12th, 2024, or migrated to the Central Portal by their support).
- Publishing your library in a GitHub repository.
- Using GitHub Actions for continuous integration.
Most of the steps here are still applicable if you’re using a different setup, but there might be some differences you need to account for. An important limitation is that Apple targets must be built on a machine with macOS.
Throughout this guide, we’ll use the https://github.com/kotlin-hands-on/fibonacci repository as an example. You can refer to the code of this repository to see how the publishing setup works. You must replace all example values with your own as you’re configuring your project.
Prepare accounts and credentials
Register a namespace
Artifacts published to Maven repositories are identified by their coordinates, for example com.example:library:1.0.0.
These coordinates are made up of three parts, separated by colons: the groupId, artifactId, and version.
As a first step for publishing to Maven Central, you’ll need to have a verified namespace. The groupId of the
artifacts you publish will have to start with the name of your verified namespace. For example, if you register the
com.example namespace, you’ll be able to publish artifacts with the groupId set to com.example or
com.example.libraryname.
To get started with publishing to Maven Central, sign in (or create a new account) on the Maven Central portal. Once signed in, navigate to Namespaces under your profile, and click the Add Namespace button. Here, you can register a namespace for your artifacts, either based on your GitHub account or a domain name that you own.
For a GitHub repository Using your GitHub account to create a namespace is a good option if you don’t own a domain name to use for publication. To create a namespace based on your GitHub account:
- Enter
io.github.<your username>as your namespace. For example,io.github.kotlin-hands-on. - Copy the Verification Key displayed.
- On GitHub, create a new repository with your GitHub account with the verification key as the repository’s name. For
example,
http://github.com/kotlin-hands-on/ex4mpl3c0d. - Navigate back to Maven Central, and click on the Verify Namespace button. After verification succeeds you can delete the repository you’ve created.
For a domain name To use a domain name that you own as your namespace:
- Enter your domain as the namespace using a reverse-DNS form. If your domain is
example.com, entercom.example. - Copy the Verification Key displayed.
- Create a new DNS TXT record with the verification key as its contents. See Maven Central’s FAQ for more information on how to do this with various domain registrars.
- Navigate back to Maven Central, and click on the Verify Namespace button. After verification succeeds you can delete the TXT record you’ve created.
Generate a Key Pair
Artifacts published to Maven Central must be signed with a PGP signature, which allows users to validate the origin of artifacts.
To get started with signing, you’ll need to generate a key pair:
- The private key is used to sign your artifacts, and should never be shared with others.
- The public key can be used by others to validate the signature of the artifacts, and should be published.
The gpg tool that can manage signatures for you is available
from their website. You can also install it using package managers such
as Homebrew:
brew install gpg
Generate a key pair with the following command, and fill in the required details when prompted.
gpg --full-generate-key
Choose the recommended defaults for the type of key to be created. You can leave these selections empty and press Enter to accept the default values.
[!NOTE] At the time of writing, this is
ECC (sign and encrypt)withCurve 25519. Older versions ofgpgmight default toRSAwith a3072bit key size.
Next, you’ll be prompted to set the expiration of the key. If you choose to create a key that automatically expires after a set amount of time, you’ll need to extend its validity when it expires.
You will be asked for your real name, email, and a comment. You can leave the comment empty.
Please select what kind of key you want:
    (1) RSA and RSA
    (2) DSA and Elgamal
    (3) DSA (sign only)
    (4) RSA (sign only)
    (9) ECC (sign and encrypt) *default*
    (10) ECC (sign only)
    (14) Existing key from card
Your selection? 9

Please select which elliptic curve you want:
    (1) Curve 25519 *default*
    (4) NIST P-384
    (6) Brainpool P-256
Your selection? 1

Please specify how long the key should be valid.
    0 = key does not expire
    <n>  = key expires in n days
    <n>w = key expires in n weeks
    <n>m = key expires in n months
    <n>y = key expires in n years
Key is valid for? (0) 0
Key does not expire at all

Is this correct? (y/N) y
GnuPG needs to construct a user ID to identify your key.
You will be asked for a passphrase to encrypt the key, which you have to repeat. Keep this passphrase stored securely and privately. You’ll be using it later to access the private key.
Let’s take a look at the key we’ve created with the following command:
gpg --list-keys
The output will look something like this:
pub   ed25519 2024-10-06 [SC]
      F175482952A225BFC4A07A715EE6B5F76620B385CE
uid   [ultimate] Your name <your email address>
      sub   cv25519 2024-10-06 [E]
You’ll need to use the long alphanumerical identifier of your key displayed here in the following steps.
Upload the public key
You need
to upload the public key to a keyserver
for it to be accepted by Maven Central. There are multiple available keyservers, we’ll use keyserver.ubuntu.com as a
default choice.
Run the following command to upload your public key using gpg, substituting your own keyid in the parameters:
gpg --keyserver keyserver.ubuntu.com --send-keys F175482952A225BFC4A07A715EE6B5F76620B385CE
Export your private key
To let your Gradle project access your private key, you’ll need to export it to a file. Use the following command, * passing in your own keyid* as a parameter. You will be prompted to enter the passphrase you’ve used when creating the key.
gpg --armor --export-secret-keys F175482952A225BFC4A07A715EE6B5F76620B385CE > key.gpg
This will create a key.gpg file which contains your private key.
[!CAUTION] Never share a private key with anyone.
If you check the contents of the file, you should see contents similar to this:
-----BEGIN PGP PRIVATE KEY BLOCK-----
lQdGBGby2X4BEACvFj7cxScsaBpjty60ehgB6xRmt8ayt+zmgB8p+z8njF7m2XiN
...
bpD/h7ZI7FC0Db2uCU4CYdZoQVl0MNNC1Yr56Pa68qucadJhY0sFNiB63KrBUoiO
-----END PGP PRIVATE KEY BLOCK-----
Generate the user token
Your project will also need to authenticate with Maven Central to upload artifacts. On the Central Portal, navigate to the Account page, and click on Generate User Token.
The output will look like the example below, containing a username and a password. Store this information securely, as it can’t be viewed again on the Central Portal. If you lose these credentials, you’ll need to generate new ones later.
<server>
    <id>${server}</id>
    <username>l3nfaPmz</username>
    <password>gh9jT9XfnGtUngWTZwTu/8241keYdmQpipqLPRKeDLTh</password>
</server>
Configure the project
Prepare your library project
If you started developing your library from a template project, this is a good time to change any default names in the
project to match your own library’s name. This includes the name of your library module, and the name of the root
project in your top-level build.gradle.kts file.
If you have an Android target in your project, you should follow the steps to prepare your Android library release. This, at a minimum, requires you to specify an appropriate namespace for your library, so that a unique R class will be generated when their resources are compiled. Notice that the namespace is different from the Maven namespace created in the Register a namespace section above.
// build.gradle.kts

android {
    namespace = "io.github.kotlinhandson.fibonacci"
}
Set up the publishing plugin
This guide uses vanniktech/gradle-maven-publish-plugin to help with publications to Maven Central. You can read more about the advantages of the plugin here. See the plugin’s documentation to learn more about its usage and available configuration options.
To add the plugin to your project, add the following line in the plugins block, in your library module’s
build.gradle.kts file:
// build.gradle.kts

plugins {
    id("com.vanniktech.maven.publish") version "0.29.0"
}
Note: for the latest available version of the plugin, check its releases page.
In the same file, add the following configuration. Customize all these values appropriately for your library.
// build.gradle.kts

mavenPublishing {
    publishToMavenCentral(SonatypeHost.CENTRAL_PORTAL)

    signAllPublications()

    coordinates(group.toString(), "fibonacci", version.toString())

    pom {
        name = "Fibonacci library"
        description = "A mathematics calculation library."
        inceptionYear = "2024"
        url = "https://github.com/kotlin-hands-on/fibonacci/"
        licenses {
            license {
                name = "The Apache License, Version 2.0"
                url = "https://www.apache.org/licenses/LICENSE-2.0.txt"
                distribution = "https://www.apache.org/licenses/LICENSE-2.0.txt"
            }
        }
        developers {
            developer {
                id = "kotlin-hands-on"
                name = "Kotlin Developer Advocate"
                url = "https://github.com/kotlin-hands-on/"
            }
        }
        scm {
            url = "https://github.com/kotlin-hands-on/fibonacci/"
            connection = "scm:git:git://github.com/kotlin-hands-on/fibonacci.git"
            developerConnection = "scm:git:ssh://git@github.com/kotlin-hands-on/fibonacci.git"
        }
    }
}
Note that it’s also possible to use Gradle properties instead.
Some of the most important, required settings here are:
- The
coordinates, which specify thegroupId,artifactId, andversionof your library. - The license that you’re publishing your library under.
- The developer information which lists the authors of the library.
- SCM (Source Code Management) information, which specifies where the sources of your library are available.
Publish to Maven Central from Continuous Integration
Add a GitHub Actions workflow to your project
You can set up continuous integration which builds and publishes your library for you. We’ll use GitHub Actions as an example.
To get started, add the following workflow to your repository, in the .github/workflows/publish.yml file.
# .github/workflows/publish.yml

name: Publish
on:
  release:
    types: [ released, prereleased ]
jobs:
  publish:
    name: Release build and publish
    runs-on: macOS-latest
    steps:
      - name: Check out code
        uses: actions/checkout@v4
      - name: Set up JDK 21
        uses: actions/setup-java@v4
        with:
          distribution: 'zulu'
          java-version: 21
      - name: Publish to MavenCentral
        run: ./gradlew publishToMavenCentral --no-configuration-cache
        env:
          ORG_GRADLE_PROJECT_mavenCentralUsername: ${{ secrets.MAVEN_CENTRAL_USERNAME }}
          ORG_GRADLE_PROJECT_mavenCentralPassword: ${{ secrets.MAVEN_CENTRAL_PASSWORD }}
          ORG_GRADLE_PROJECT_signingInMemoryKeyId: ${{ secrets.SIGNING_KEY_ID }}
          ORG_GRADLE_PROJECT_signingInMemoryKeyPassword: ${{ secrets.SIGNING_PASSWORD }}
          ORG_GRADLE_PROJECT_signingInMemoryKey: ${{ secrets.GPG_KEY_CONTENTS }}
After committing and pushing this change, this workflow will run automatically when you create a release (including a
pre-release) in the GitHub repository hosting your project. It checks out the current version of your code, sets up a
JDK, and then runs the publishToMavenCentral Gradle task.
[!NOTE] Alternatively, you could configure the workflow to trigger when a tag is pushed to your repository.
The script above disables Gradle configuration cache for the publication task by adding
--no-configuration-cacheto the Gradle command, as the publication plugin does not support it (see this open issue).Reminder: When using
publishToMavenCentral, you’ll still need to check and release your deployment manually on the website, as described in the previous section. You may usepublishAndReleaseToMavenCentralinstead for a fully automated release.
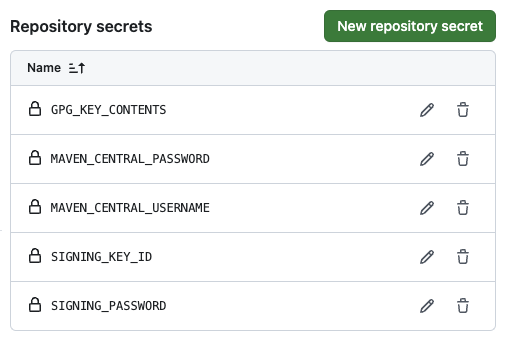
This action will need your signing details and your Maven Central credentials. These will be configured as GitHub Actions secrets in the next section. The configuration of the workflow above takes these secrets and places them into environment variables, which will make them available to the Gradle build automatically.
Add secrets to GitHub
To use the keys and credentials required for publication in your GitHub Action workflow while keeping them private, you
need to place those values into secrets. From your GitHub repository, go to Settings >
(Security) Secrets and variables > Actions.
Click on the New repository secret button, and add the following secrets:
MAVEN_CENTRAL_PASSWORDandMAVEN_CENTRAL_PASSWORDare the values generated by the Central Portal website in the Generate User Token section.SIGNING_KEY_IDis the last 8 characters of your signing key’s identifier.SIGNING_PASSWORDis the passphrase you’ve provided when generating your signing key.GPG_KEY_CONTENTSshould contain the contents of your GPG private key file, which you’ve created earlier in the Export your private key section.
Note again that the names used for these secrets must match those used by the workflow that accesses their values.
Create a release on GitHub
With the workflow and secrets set up, you’re now ready to create a release that will trigger the publication of your library.
Go to your GitHub repository’s main page, and click on Releases in the menu in the right sidebar.
Click Draft a new release.
Each release creates a new tag. Set the name for the tag to be created, and set a name for the release (these may be
identical). Note that setting a version here does not change the version of your coordinates configured in your
build.gradle.kts file, so you should update that version before creating a new release.
Double-check the branch you want to target with the release (especially if you want to release from a branch that’s different from your default), and add appropriate release notes for your new version.
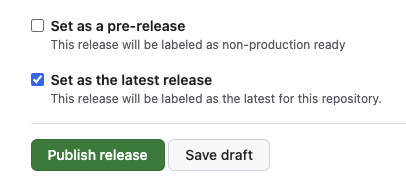
The checkboxes below allow you to mark a release as a pre-release (useful for alpha, beta, or RC versions of a library), or to set the release as the latest available one:
Click the Publish release button to create the new release. This will immediately show up on your GitHub repository’s main page.
Click the Actions tab on the top of your GitHub repository. Here you’ll see the new workflow was triggered by the GitHub release. Click it to see the outputs of the publication task.
After this task completes successfully, navigate to the Deployments dashboard. You should see a new deployment here. This deployment will be in the pending and validating states for some time while Maven Central performs checks on it.
Once your deployment moves to a validated state, you should see that it contains all the artifacts you’ve uploaded. If everything looks correct, click the Publish button to release these artifacts.
Note that it will take some time (about 15–30 minutes, usually) after the release for the artifacts to be available publicly on Maven Central. Also note that the library may be available for use before they are indexed on the Maven Central website.
There’s also another task available which both uploads and releases the artifacts automatically once the deployment is verified, without having to manually release them on the website:
./gradlew publishAndReleaseToMavenCentral
Et voilà, you have successfully published your library to Maven Central.
Next steps
- Share your library with the Kotlin Community in the
#feedchannel in the Kotlin Slack (To sign up visit https://kotl.in/slack.) - Add shield.io badges to your README.
- Create a documentation site for your project using Writerside.
- Share API documentation for your project using Dokka.
- Add Renovate to automatically update dependencies.


